Developer Guide
- Setting up, getting started
- Introduction
- Purpose and Audience for this Guide
- Setting Up
- Design
- Implementation
- Documentation, logging, testing, configuration, dev-ops
-
Appendix: Requirements
- Product scope
- Implemented User stories
- Potential User stories
-
Use cases
- Use case: UC01 - Add a student
- Use case: UC02 - Delete a student
- Use case: UC03 - Edit a student
- Use case: UC04 - Allocate a room to a student
- Use case: UC05 - Delete a room allocation for a student
- Use case: UC06 - Edit an existing room allocation
- Use case: UC07 - Undo previous command
- Use case: UC08 - Redo previous command
- Use case: UC09 - History command
- Use case: UC10 - Archive command
- Use case: UC11 - Find rooms which match a specific criteria
- Use case: UC12 - Find students which match a specific criteria
- Use case: UC13 - Add a room
- Use case: UC14 - Delete a room
- Use case: UC15 - Edit a room
- Use case: UC16 - Add an alias
- Use case: UC17 - Delete an alias
- Use case: UC18 - Restore deleted items
- Non-Functional Requirements
- Glossary
- Appendix: Instructions for manual testing
Setting up, getting started
Refer to the guide Setting up and getting started.
Introduction
ResiReg is a productivity app designed to help OHS* admin at Residential Colleges (RCs)* in NUS with their daily tasks.
ResiReg has the following main features:
- Manage records of students.
- Manage records of rooms.
- Manage allocations of students to rooms in the College.
Purpose and Audience for this Guide
This Developer Guide specifies the architecture, design, implementation and use cases for ResiReg, as well as our considerations behind key design decisions.
It is intended for developers, software testers, open-source contributors and any like-minded students who wish to contribute this project or gain deeper insights about ResiReg.
Setting Up
Refer to the guide here.
Design
Architecture

The Architecture Diagram given above explains the high-level design of the App. Given below is a quick overview of each component.
.puml files used to create diagrams in this document can be found in the diagrams folder. Refer to the PlantUML Tutorial at se-edu/guides to learn how to create and edit diagrams.
Main has two classes called Main and MainApp. It is responsible for,
- At app launch: Initializes the components in the correct sequence, and connects them up with each other.
- At shut down: Shuts down the components and invokes cleanup methods where necessary.
Commons represents a collection of classes used by multiple other components.
The rest of the App consists of four components.
-
UI: The UI of the App. -
Logic: The command executor. -
Model: Holds the data of the App in memory. -
Storage: Reads data from, and writes data to, the hard disk.
Each of the four components,
- defines its API in an
interfacewith the same name as the Component. - exposes its functionality using a concrete
{Component Name}Managerclass (which implements the corresponding APIinterfacementioned in the previous point.
For example, the Logic component (see the class diagram given below) defines its API in the Logic.java interface and exposes its functionality using the LogicManager.java class which implements the Logic interface.

How the architecture components interact with each other
The Sequence Diagram below shows how the components interact with each other for the scenario where the user issues the command delete-student si/1.

The sections below give more details of each component.
UI component

API :
Ui.java
The UI consists of a MainWindow that is made up of parts e.g.CommandBox, ResultDisplay, MainPanel, StatusBarFooter etc. MainPanel in turn is made up of the various tabs represented as StudentListPanel, RoomListPanel and BinItemListPanel and their constitutent parts. All these, including the MainWindow, inherit from the abstract UiPart class.
The UI component uses JavaFx UI framework. The layout of these UI parts are defined in matching .fxml files that are in the src/main/resources/view folder. For example, the layout of the MainWindow is specified in MainWindow.fxml
The UI component,
- Executes user commands using the
Logiccomponent. - Listens for changes to
Modeldata so that the UI can be updated with the modified data.
When the app is launched, StudentListPanel is displayed to allow the user to manage student records. When a room tab session is to be shown, StudentListPanel becomes hidden, and the RoomListPanel is displayed to allow the user to edit and view rooms, by exposing a MainPanel#handleToggle method to the Logic components.
Logic component

Notes:
- XYZCommand refers to concrete Command classes such as
AddCommand,ExitCommand, etc. - Utility classes, such as those used by the CommandParsers (eg.
CliSyntax,ParserUtil,ArgumentMultimap,ArgumentTokenizer) and those used by only a few specific Commands (eg.CreateEditCopy) have been omitted from the diagram for clarity.
API :
Logic.java
-
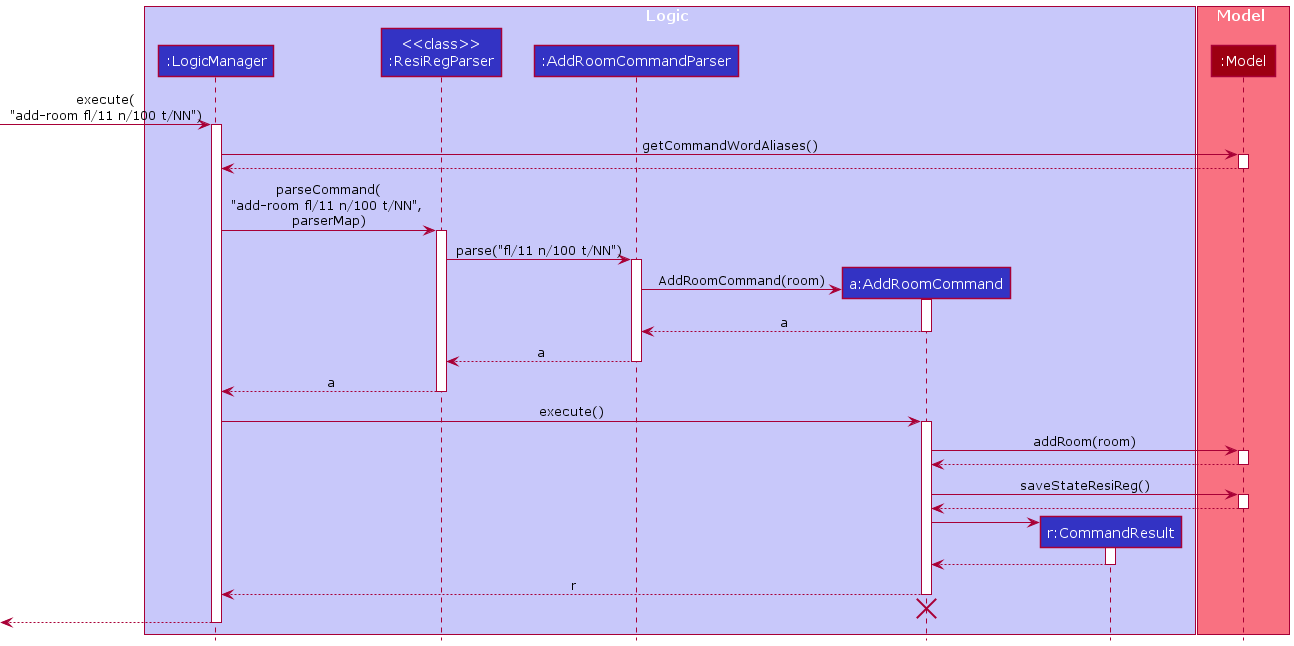
LogicManagergets a list of the current user-defined aliases from theModel. -
LogicManageruses the list of aliases together with information fromCommandWordEnumto generate a map of strings (representing all the possible strings that a user may use to call a command) toParsers. -
LogicManagerpasses the user input and this map toResiRegParser, which parses the user command. - This results in a
Commandobject which is executed by theLogicManager. - The command execution can affect the
Model(e.g. adding a student). - The result of the command execution is encapsulated as a
CommandResultobject which is passed back to theUi. - In addition, the
CommandResultobject can also instruct theUito perform certain actions, such as displaying help to the user.
Given below is the Sequence Diagram for interactions within the Logic component for the execute("add-room fl/11 n/100 t/NN") API call.
Model component

API : Model.java
The Model,
- stores a
UserPrefobject that represents the user’s preferences. - stores the ResiReg data
- exposes the following
ObservableLists that can be ‘observed’ e.g. the UI can be bound to this list so that the UI automatically updates when the data in the list change:- unmodifiable
ObservableList<Student> - unmodifiable
ObservableList<Room> - unmodifiable
ObservableList<Allocation> - unmodifiable
ObservableList<BinItem>
- unmodifiable
Storage component

API : Storage.java
The Storage component,
- can save
UserPrefobjects in json format and read it back. - can save the ResiReg data in json format and read it back.
Common classes
Classes used by multiple components are in the seedu.resireg.commons package.
Implementation
This section describes some noteworthy details on how certain features are implemented.
Bin Feature
Implementation
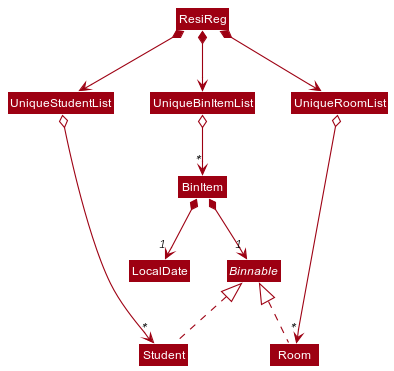
ResiReg allows for a bin feature, where students and rooms are moved to a bin on deletion, and persist there for a user-specified period (with a default of 30 days) before they are removed permanently. The feature is built using the BinItem, UniqueBinItemList and JsonAdaptedBinItem classes and an empty interface Binnable. Items that can be stored in the bin (Student and Room) implement the empty1 interface Binnable. A BinItem object is created when a Binnable object is deleted, and it contains the Binnable object and the date of deletion (implemented as a LocalDate) as its attributes. Consequently, the BinItem is placed into UniqueBinItemList.
The class diagram below represents the class structure pictorially.
The following is a run-through of a typical user session where ResiReg is started, a student is deleted and moved to the bin, and then the user restores the student from the bin. Note that the sequence is the same for when a room is deleted and restored.
Step 1. On launching ResiReg, ModelManager calls ModelManager#deleteExpiredItems() during initialization. This method iterates through UniqueBinItemList and removes all bin items which have expired (i.e they have persisted in the bin for more days than the user-specified cutoff) by calling UniqueBinItemList#remove() for the expired object.
Step 2. The user executes the delete 1 command to delete the first student in ResiReg.
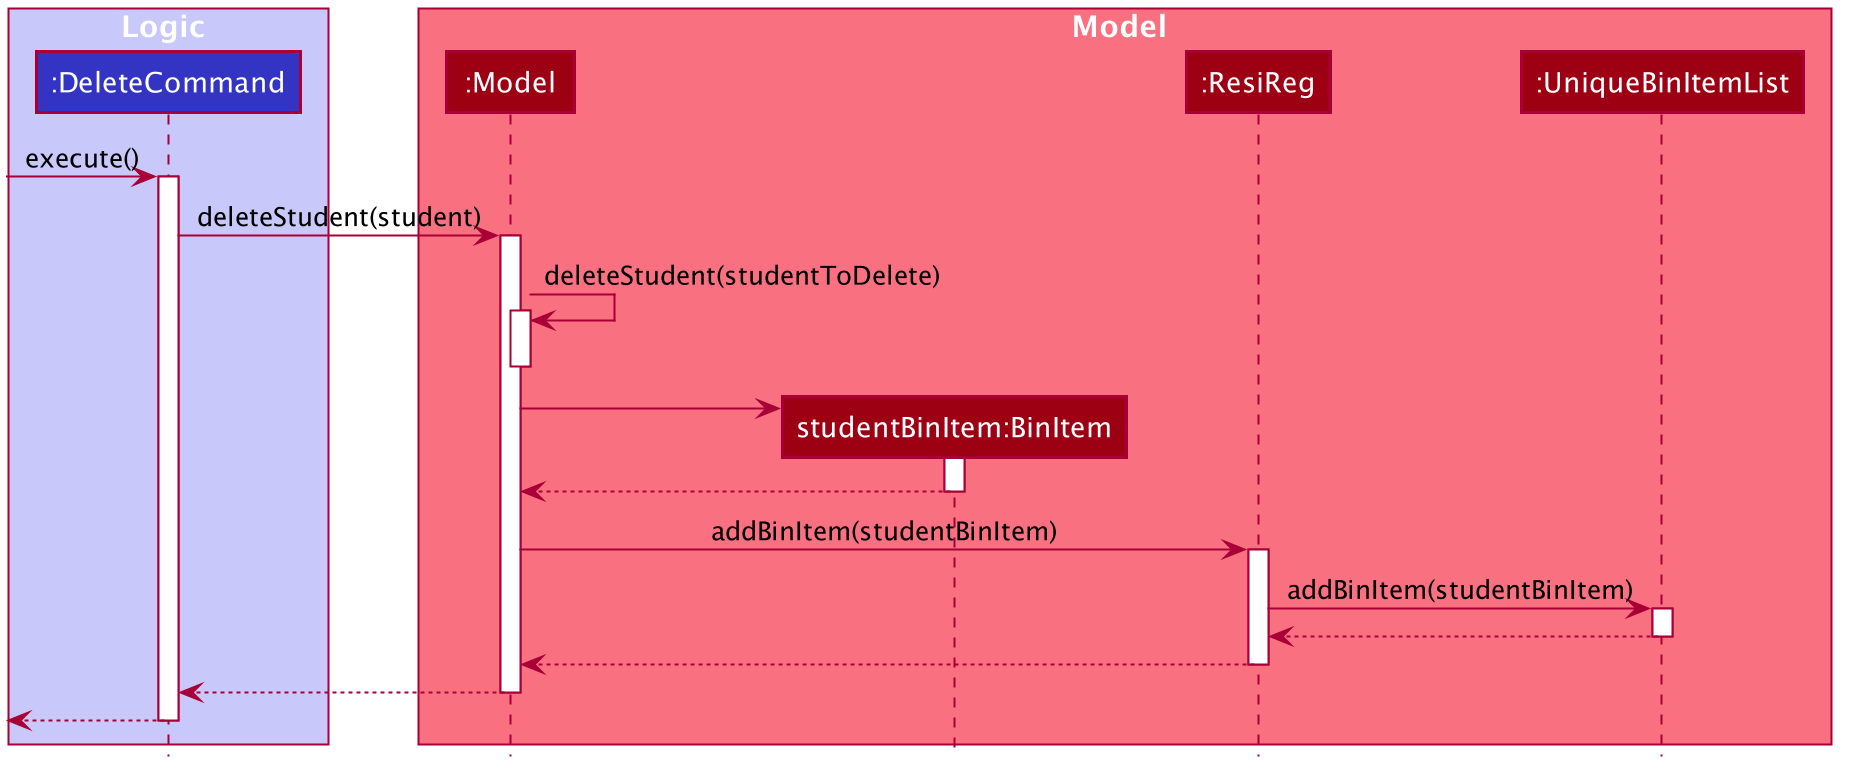
The delete command calls the constructor of BinItem with the deleted student to create a new BinItem object. The dateDeleted attribute is initialized with the current system time.
Step 3. The delete command then adds the new BinItem object to the UniqueBinItemList by first checking for uniqueness (as a defensive precaution) and calling Model#addBinItem(studentToBin).
The sequence diagram given below represents this process of deleting a student (steps 2 and 3).
Step 4. The user executes a few other commands. He then cognizes that he has erroneously deleted the student, and doesn’t wish to execute the undo command multiple times. He then navigates to the Bin tab, (by executing bin) and executes the restore command to retrieve the Student item from the bin.
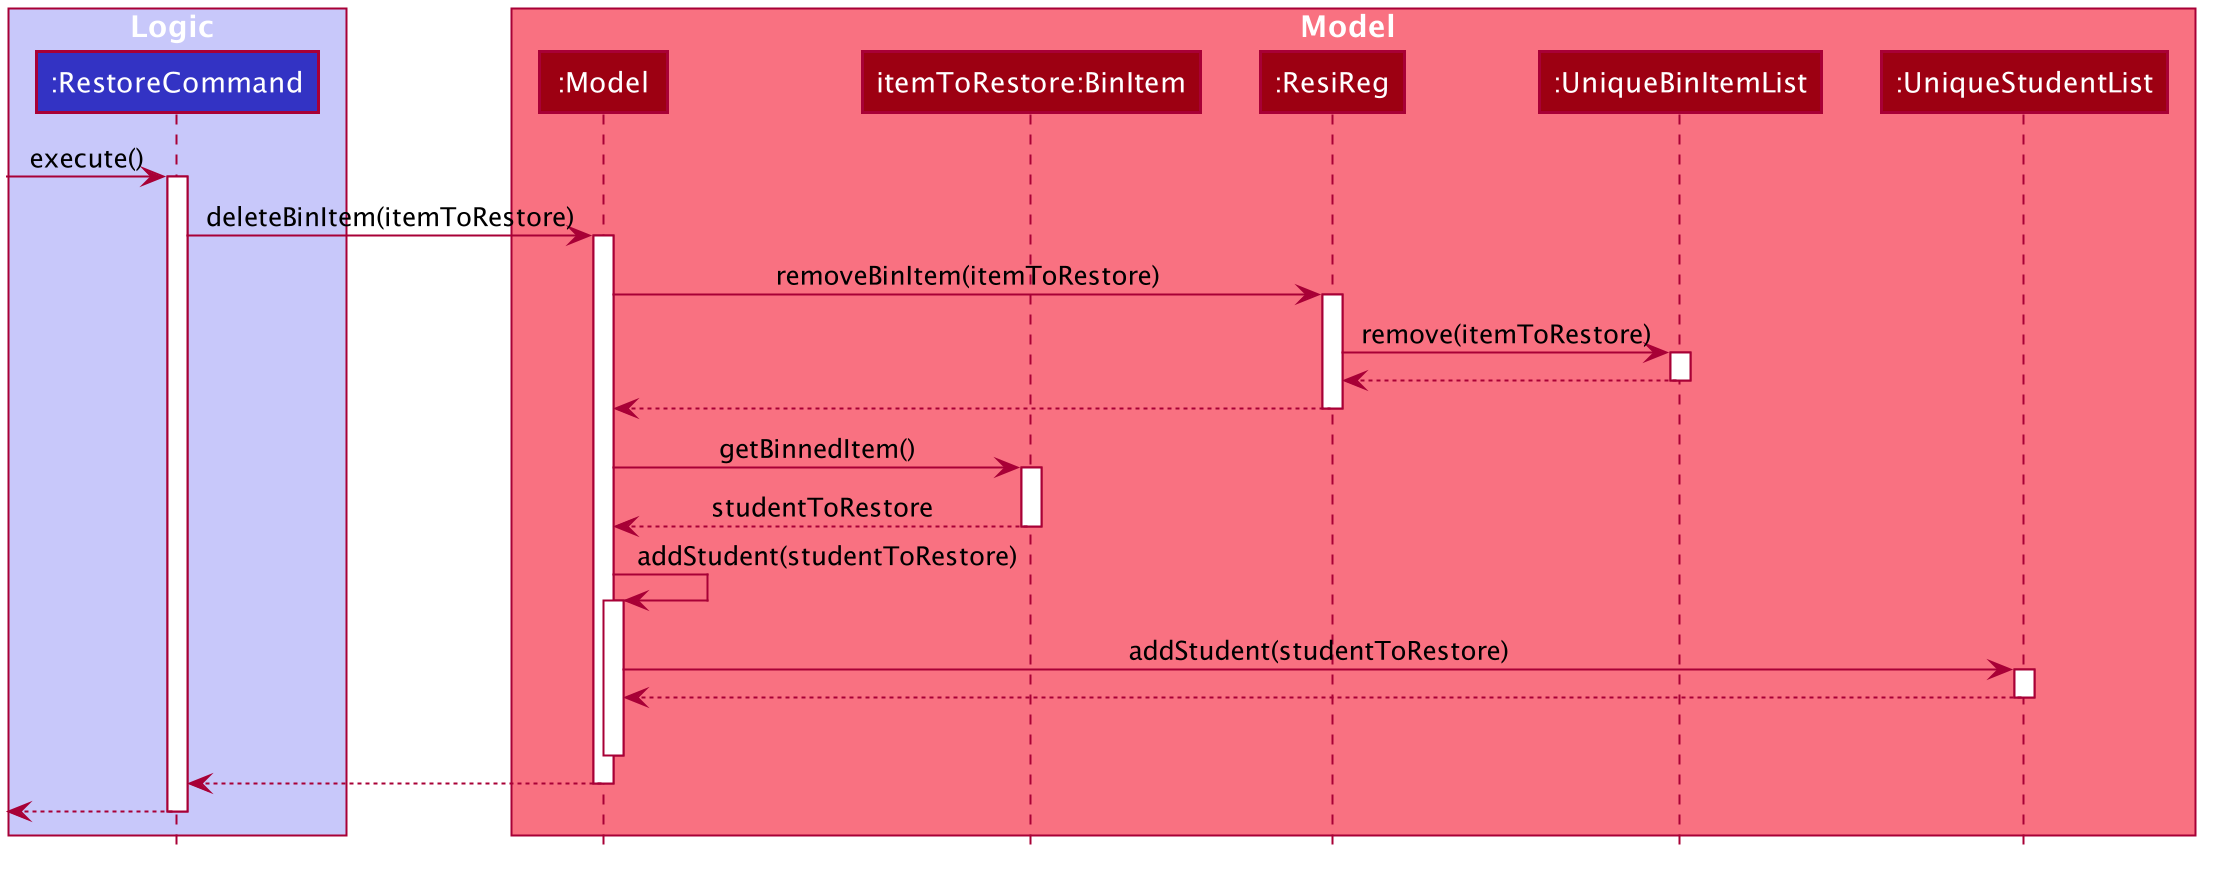
Step 5. The execute method of RestoreCommand removes the itemToRestore from UniqueBinItemList by caling Model#deleteBinItem(itemToRestore). The student item is retrieved by calling an instance method, itemToRestore.getBinnedItem() and typecasted to a Student object.
Step 6. The Ui is updated accordingly, since both the UniqueBinItemList and UniqueStudentList follow the Observer pattern.
The following sequence diagram shows how a restore command operates.
1 Refer below for the design decision of maintaining an empty interface (which enforces no method or variable definitions).
Design Consideration
Aspect: Handling the storage of bin items
Problem Statement: A bin item must be polymorphic in its storage, i.e., it must be capable of serializing and deserializing multiple types of data (Students as well as Rooms). However, JSON does not support polymorphic storage natively, and a concrete serializable type must be provided during read/write operations. This leads to the problem of how to store Binnable instances whose concrete type is not known.
-
Alternative 1 (current choice): Reusing storage classes for
RoomandStudentand typecasting explicitly- Pros: Allows a clean separation of concerns since the
Binnableinterface does not need to contain information about storage. This removes the need to repeat code by creating storage classes such asJsonAdaptedStudentBinandJsonAdaptedRoomBindedicated to storing objects in the Bin only. In other words, it makes the Ui, Logic and Model structure OOP-compliant. Further, it results in more efficient testing (since storage tests forStudentandRoomobjects need not be re-written) - Cons: Doesn’t scale well since if new types of
Binnableobjects are to be handled by the system (e.g.Bills), then multiple storage-related files will have to be modified to allow for the new object to have robust type-checking and storage. In other words, it makes the storage less OOP-compliant.
- Pros: Allows a clean separation of concerns since the
-
Alternative 2: Assigning storage responsibility to the
Binnableinterface- Pros: Makes storage more OOP-compliant, prevents need for explicit type-checking.
- Cons: Complicates the general MVC structure, and makes it more difficult to migrate to non-JSON storage, since instances of
Binnable(e.g.StudentandRoom) must now contain their storage implementation details as well.
Allocation/ Deallocation/ Reallocation Feature
The allocation/ deallocation/ reallocation feature is facilitated by Allocation. It is an association class of the
unique identifiers of a Student and a Room to which the Student is allocated to. The Allocation association
class includes the Student’s StudentId and the allocated Room’s Floor and RoomNumber.
Implementation
When a Student is allocated a Room using AllocateCommand, an Allocation instance is created and added to the
UniqueAllocationList. Likewise, when a Student is deallocated or reallocated a different Room using DeallocateCommand and
ReallocateCommand respectively, the Allocation relating to the Student is removed from ResiReg in the former
and edited in the latter.
The follow class diagram shows how Allocation is implemented.
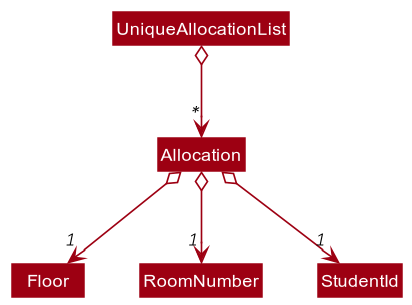
Given below is an example usage scenario and how the allocation mechanism behaves at each step.
Step 1. The user executes allocate si/1 ri/1 command to allocate the first student in ResiReg to the first room in ResiReg.
Step 2. The LogicManager executes the user input, running parseCommand to AllocateCommandParser.
Step 3. The arguments si/1 ri/1 are parsed by AllocateCommandParser and the AllocateCommand instance is created.
Step 4. The AllocateCommand instance is executed in LogicManager, which performs 3 actions: setStudent, setRoom and addAllocation to the Model.
Step 5. A CommandResult is returned.
The following sequence diagram shows how an allocate command operates.
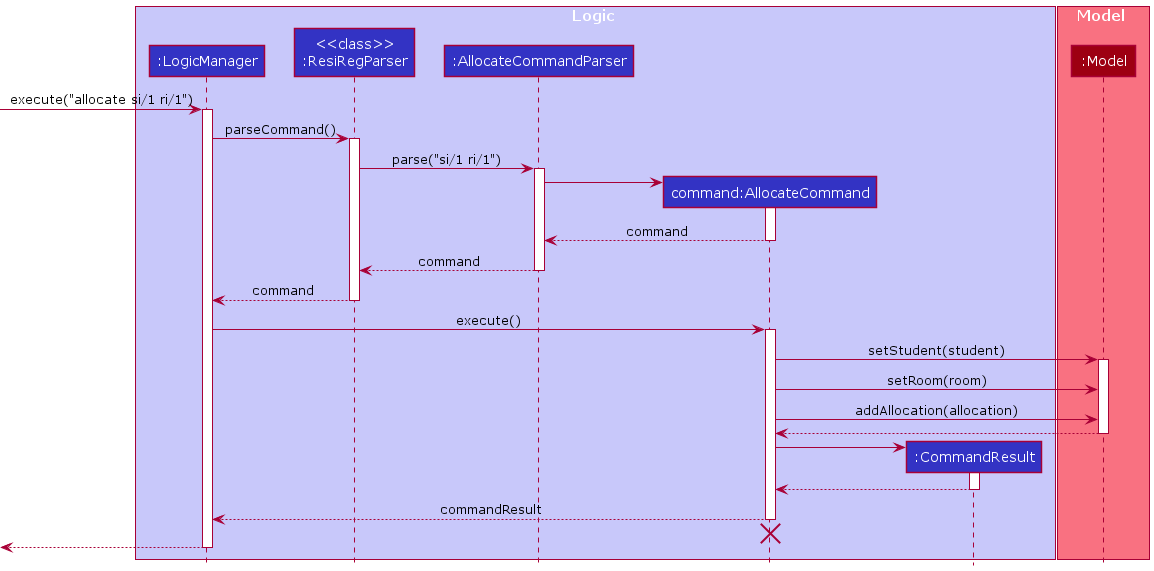
Design consideration
Aspect: How to associate the allocation between a student and a room
-
Alternative 1: A student has a room.
- Pros: Trivial implementation.
- Cons: Storage redundancy as a student now has a copy of a room.
-
Alternative 2: A room has a student.
- Pros: Trivial implementation.
- Cons: Storage redundancy as a room now has a copy of a student.
-
Alternative 3: A student has a room and a room has a student.
- Pros: Easy implementation.
- Cons: Cyclic dependency between a room and a student.
-
Alternative 4 (final choice): A student’s room allocation is referred to by an association class.
- Pros: Natural representation of the allocation.
- Cons: Require more overhead code.
Having attempted a Student having a Room attribute and/or vice versa, it inevitably ends
up with a cyclic dependency in various parts of the code, such as the Student or Room’s toString() methods or
their JsonAdapted variants, which is undesired. Therefore, the room allocation functionality was refactored into
the Allocation association class (alternative 4).
Undo/redo feature
Implementation
The undo/redo mechanism is added to allow users of ResiReg to revert to a previous state or return to the future state (that is the previously current state), undoing or redoing changes made to the state of ResiReg.
This mechanism is facilitated by StatefulResiReg, an instance of which is stored inside ModelManager. It extends ResiReg with an undo/redo history, for commands that
modify the state of ResiReg, which comprises of: students, rooms, allocations, semesters and bin items.
The class diagram below gives a pictorial representation of the class structure.
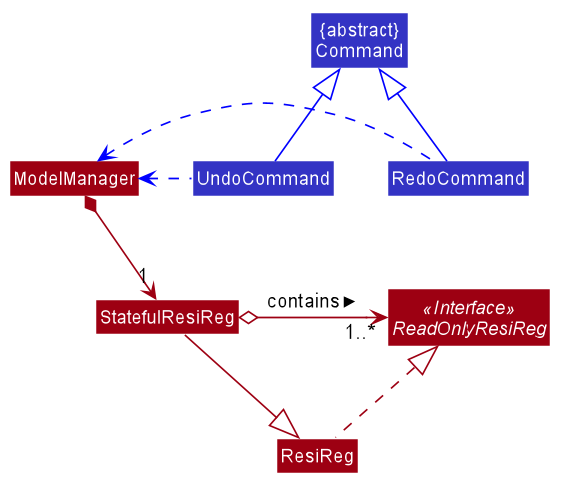
The state history is stored internally as redoStatesStack, undoStatesStack and currState. Additionally, it implements the following operations:
-
StatefulResiReg#save()— Saves the current ResiReg state in its state history. -
StatefulResiReg#undo()— Restores the previous ResiReg state from its state history. -
StatefulResiReg#redo()— Restores a previously undone ResiReg state from its state history.
These operations are exposed in the Model interface as Model#saveStateResiReg(), Model#undoResiReg() and Model#redoResiReg() respectively.
Given below is an example usage scenario and how the undo/redo mechanism behaves at each step.
Step 1. The user launches the application for the first time. The StatefulResiReg will be initialized with the initial ResiReg state.
Both redoStatesStack and undoStatesStack will be empty, while currState will be set to this single ResiReg state.

Step 2. The user executes delete 3 command to delete the 3rd student in the ResiReg. The delete command calls Model#saveStateResiReg(), causing the current state of the ResiReg before the delete 3 command executes
to be saved in the undoStatesStack and setting currState to be the state of the resident regulation after command execution.

Step 3. The user executes add n/Jet … to add a new student. The add command also calls Model#saveStateResiReg(), causing the
current unmodified state to be saved in the undoStatesStack and currState to be set to the modified resident regulation state.

Model#saveStateResiReg(), so
both currState and undoStatesStack will not be updated.
Step 4. The user now decides that adding the student was a mistake, and decides to undo that action by executing the undo command. The undo command will call Model#undoResiReg(),
which will add the current state stateAfterAdd to redoStatesStack and set currState to the last entry in
undoStatesStack, the previous ResiReg state (stateBeforeAdd), and restores the ResiReg to that state.

redoStatesStack is empty, then there are no previous ResiReg states to restore.
The undo command uses Model#canUndoResiReg() to check if this is the case. If so, it will return an error to the user rather
than attempting to perform the undo.
The following sequence diagram shows how the undo operation works:

The redo command does the opposite — it calls Model#redoResiReg(), which adds the current state to undoStatesStack and set currState to the last entry in
redoStatesStack, the next ResiReg state, and restores the ResiReg to that state.
redoStatesStack is empty, then there are no undone ResiReg states to restore.
The redo command uses Model#canRedoResiReg() to check if this is the case. If so, it will return an error to the user rather than attempting to perform the redo.
Step 5. The user then decides to execute the command rooms. Commands that do not modify the state of ResiReg
(e.g. alias, rooms, togglesplit, etc.) will not call Model#saveStateResiReg(), Model#undoResiReg() or Model#redoResiReg(). Thus, both redoStatesStack and undoStatesStack remain unchanged.

Step 6. The user executes clear, which calls Model#saveStateResiReg().
As before, the current state stateBeforeClear clear will be pushed into undoStatesStack. This time redoStatesStack is no longer empty. It will be cleared as it no longer make sense to redo the add n/Jet command (this is the behavior that most modern desktop applications follow).

The following activity diagram summarizes what happens when a user executes a new command,
that is not undo or redo:
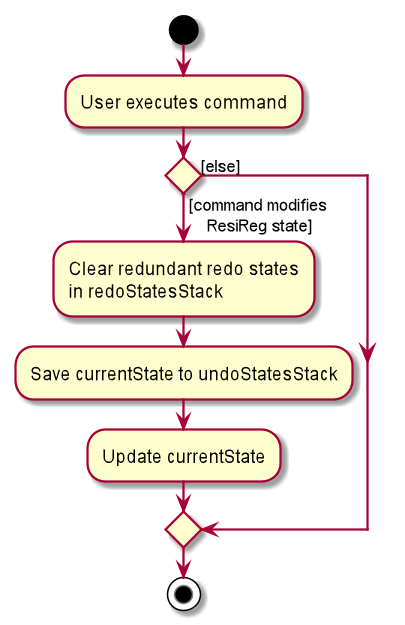
Separately, the following activity diagram summarizes what happens when a user executes
the undo command. (The activity diagram for redo is largely similar).
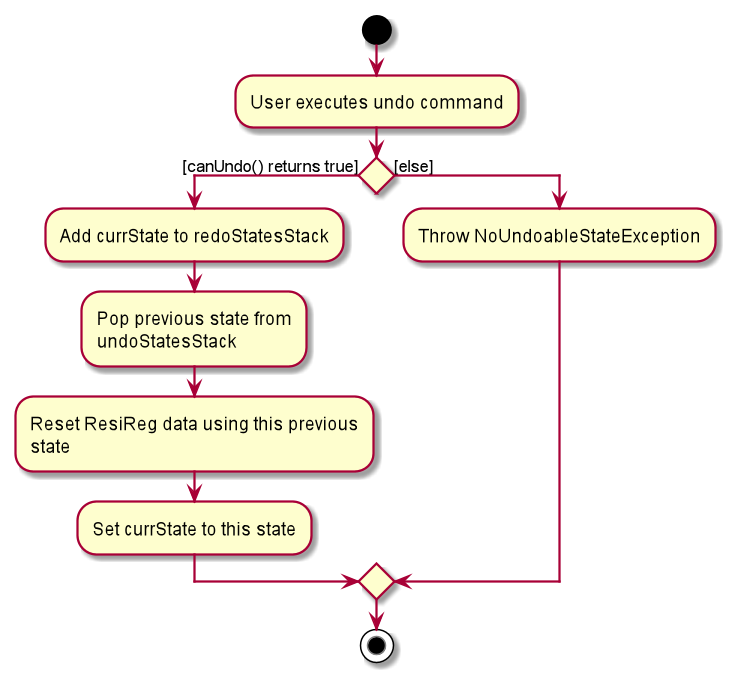
Design consideration:
How undo & redo executes
-
Alternative 1 (current choice): Saves the entire ResiReg.
- Pros: Easy to implement.
- Cons: May have performance issues in terms of memory usage.
-
Alternative 2: Individual command knows how to undo/redo by itself.
- Pros: Will use less memory (e.g. for
delete, just save the student being deleted). - Cons: We must ensure that the implementation of each individual command is correct.
- Pros: Will use less memory (e.g. for
Aspect: Data structure to support the undo/redo commands
-
Alternative 1 (current choice): Use separate stacks for undo and redo, along with a reference to current state.
- Pros: Closer to the command pattern than the alternative below, meaning a change from Alternative 1 to Alternative 2 in how undo & redo executes will incur less additional work.
- Cons:
- May have performance issues in terms of memory usage due to holding an additional reference and managing two data structures.
- Follows the Separation of Concerns principle, so the management of undoing and redoing can be viewed separately for easier understanding.
-
Alternative 2: Use a list to store the state history.
- Pros: Better performance in terms of memory usage as compared to Alternative 1 and has a simpler implementation.
- Cons:
- Further away from the command pattern than Alternative 1, so shifting to Alternative 2 in how undo & redo executes will incur more additional work.
- Also, goes against the Separation of Concerns principle since the management of both undoing and redoing is handled together.
Data archiving for semester
Allocations of a student to a room are valid only for a given semester. This implies that ResiReg should support the archival and creation of multiple semesters, so that the data can be managed and stored in an organized fashion that suits the OHS admin. The archive command accomplishes this by allowing the user to achive the current semester’s allocations, and advance to a new semester which pre-fills the Student and Room details.
Implementation
The archival feature is facilitated by Semester. It is a class denoting the current semester the allocations are valid for.
The following diagram shows how ResiReg is implemented with the archive feature. A Semester object denoting the current Semester is kept in the ResiReg class. Upon executing the archive command, ResiReg computes the succeeding Semester from the current Semester. A snapshot of the current semester’s data (e.g. allocations) is then stored in a folder that denotes that semester. Finally, the current semester in the application is updated, and the allocations are reset for the admin to start afresh.
Given below is an usage scenario and how the archive mechanism behaves at each step.
Step 1. The user launches the application. The current semester is initialized from the semester field inside./data/resireg.json, when MainApp.java calls Storage#readResiReg.
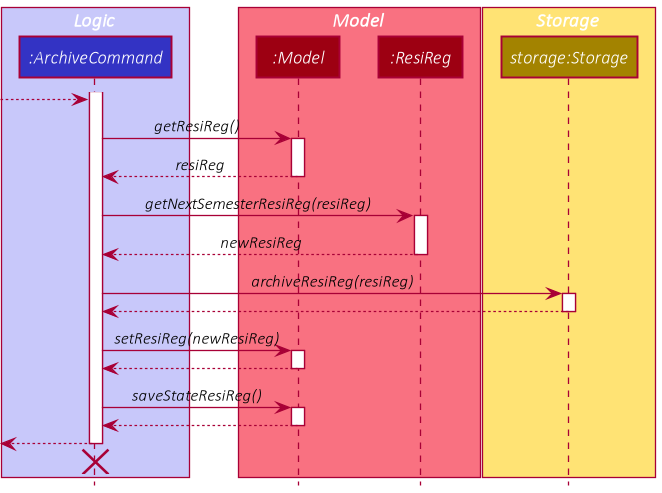
Step 2. The user executes the archive command to archive the current semester’s allocations and advance to the next semester. The archive command first retrieves the current state of ResiReg via Model#getResiReg.
Step 3. The archive command then computes the succeeding state from the current state via ResiReg#getNextSemesterResiReg. This method computes the succeeding semester from the current semester via Semester#getNextSemester, and resets the allocations of students to rooms.
Step 4. The Storage#archiveResiReg is then called. This operation saves the current data of the semester inside ./AY{YEAR}S{SEMESTER}/archive.json, where {YEAR} denotes the academic year and {SEMESTER} denotes which semester of the academic year. For example, the data of Semester 1 of Year 2020 would be stored inside ./AY2020S1/archive.json.
Step 5. Finally, the fresh semester in ResiReg is then updated in 2 steps:
Step 5.1: Firstly, the application state is updated by calling Model#setResiReg with the computed succeeding state in Step 2.
Step 5.2: Then, resireg.json is updated via Model#saveStateResiReg.
The following sequence diagram shows the flow of the archive operation as described by the 5 steps above.
Design Consideration
Aspect: Separating the archival and semester updating logic
-
Alternative 1 (current choice): keep the
archiveResiRegmethod in theStorageinterface, and computing of next Semester inSemester- Pros: Adheres to the Single-responsibility Principle. The responsibility of computing the next Semester is kept to
Semester, and saving to storage kept toStorage. - Cons: additional methods like
Semester#getNextSemesterhave to be implemented to support
- Pros: Adheres to the Single-responsibility Principle. The responsibility of computing the next Semester is kept to
-
Alternative 2: Compute the next semester directly within the
archiveResiRegmethod- Pros: violates the Single-responsibility Principle, as
archiveResiRegnow has 2 responsibilities: computing the next semester, and writing the file to storage - Cons: Compared to Alternative 1, less intermediate methods to implement.
- Pros: violates the Single-responsibility Principle, as
Help command
The help command allows the user to view the help message for any command in the application based on the command word. The command word refers to the text that the user enters to execute the application eg. delete-student for the command to delete a student, help for the help command.
Implementation
The help command is implemented in the HelpCommand class and facilitated by the Help class and CommandWordEnum.
CommandWordEnum is an enumeration class where each enumeration object stores the command word, Help object and Parser associated with a command.
HelpCommand uses CommandWordEnum to generate a mapping of each command word to its Help object, which is stored in a static variable, the commandWordToHelp map.
The steps below describes how the help command works:
- The user enters a command in the format
help <input> -
LogicManagercalls the appropriate classes, as described under the implementation of thelogiccomponent, to create an instance ofHelpCommandwith the giveninput. -
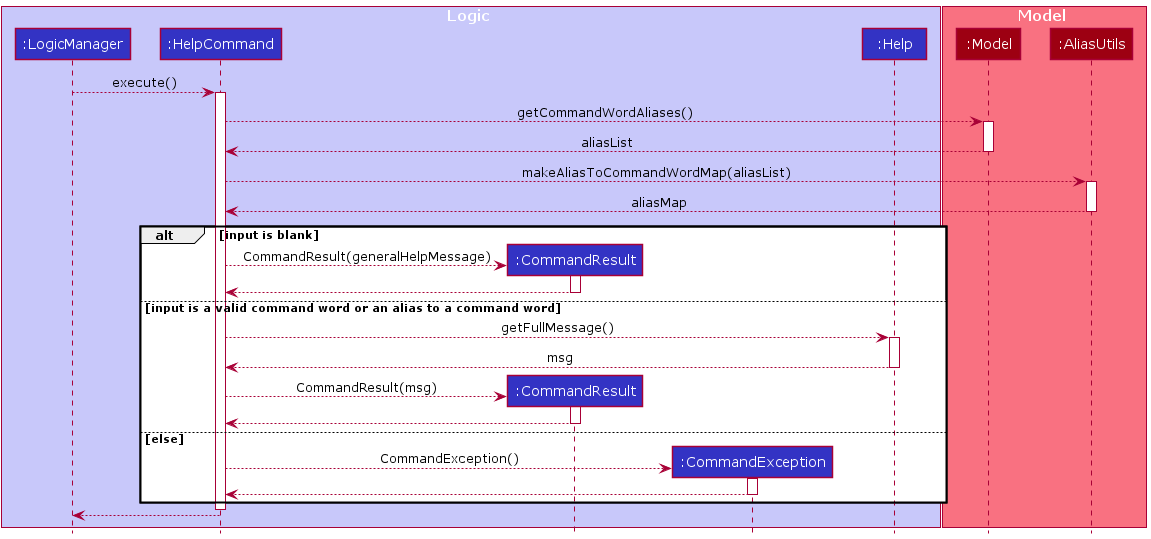
HelpCommandobtains a list of the current aliases currently registered usingModel#getCommandWordAliases. This list of aliases is transformed into a map mapping the alias to the command word usingAliasUtils#makeAliasToCommandWordMap -
HelpCommanduses the alias map to check if the input is an alias, and if it is, maps it to its proper command word. -
HelpCommandchecks if the input is blank. If it is, a general help message describing all the commands is shown to the user. This general help message is generated using thecommandWordToHelpmap. - Otherwise,
HelpCommandchecks if the input is a valid command word. If it is, the command retrieves theHelpobject for the command from thecommandWordToHelpmap and returns a message describing usage of the command usingHelp#getFullMessage. - Otherwise, this means that the input is a non-empty string which is not a valid command word, so an error message informing the user that there is no such command is shown.
The sequence diagram below summarizes these steps. Self calls have been omitted for clarity:
Design considerations
Aspect: where to store the mapping of command words to Help
Having started with AddressBook 3’s implementation of the AddressBookParser (renamed ResiRegParser in our project), which stored the mapping from each command word to its respective CommandParser, the requirements of the HelpCommand was a major reason why we chose to shift the mapping into the CommandWordEnum instead.
HelpCommand basically requires a mapping of each command to its Help object. To do this, HelpCommand needs to be able to access some kind of list or other data structure of all commands available in the application, with information about the command word and Help object for each command. These are some of the options we considered on where to store this list:
-
Alternative 1: Within the HelpCommand class, for example as a map of command words to their Help. When adding a new command, developers add another entry to the map.
- Pros: simple to implement
- Cons: it is easy for developers to forget to modify the map in the HelpCommand class when adding new commands. This mistake can easily go unnoticed as the command will still if the command word has been correctly associated with its parser.
- Alternative 2: Have a data structure inside ResiRegParser which maps each command word to both its Help and Parser. ResiRegParser uses the mapping from command word to Parser, while the mapping from command word to Help is exposed to HelpCommand via a public method or attribute.
- Pros: ensures that the HelpCommand is always up to date, as developers must bind the command word to both its Help and Parser.
- Cons: violates the single responsibility principle. ResiRegParser does not need to know about the Help for each command to parse commands. - **Alternative 3 (current choice):** Have a separate class (`CommandWordEnum`) containing a data structure that maps each command word to its Parser and Help. Developers would modify this class when adding commands. HelpCommand and ResiRegParser can use the `CommandWordEnum` to generate a mapping of each command word to its Parser or Help respectively.    - Pros:
   - Similar to alternative 2, this ensures the HelpCommand is always up to date as developers must bind the command word to both its Help and Parser.
   - Does not violate the single responsibility principle like alternative 2. Both ResiRegParser and HelpCommand only store the information they need.     - Cons:
   - `CommandWordEnum` does not check if there are multiple commands with the same command word.
Documentation, logging, testing, configuration, dev-ops
Appendix: Requirements
Product scope
Target user profile:
- an OHS admin at a Residential College* (in NUS)
- has a need to manage a large number of students and rooms (>800)
- dissatisfied with current MS Excel and paper-based workflow
- prefer desktop apps over other types
- can type fast
- prefers typing to mouse interactions
- is reasonably comfortable using CLI apps
Value proposition: manage students, rooms, and allocations faster than a typical GUI app.
Implemented User stories
Priorities: High (must have) - * * *, Medium (nice to have) - * *, Low (unlikely to have) - *
| Priority | As a… | I can… | So that I can… |
|---|---|---|---|
| * | OHS admin | find a room by searching for the room number | get the details of a specific room quickly. |
| * * | advanced user | redo the previous command | do the same task without typing again, e.g. if two students wish to pay the same bill. |
| * * | careless user | undo my last command | fix any change that I made erroneously. |
| * * | advanced user | view previous commands | check if I made an error in adding or deleting records. |
| * * * | OHS admin | view a list of vacant rooms | start assigning rooms to students during check-in. |
| * * * | OHS admin | view a room allocation for a student | check and inform a student of their room allocation during check in. |
| * * * | OHS admin | allocate a room to a student | allocate a student to a room before the semester starts. |
| * * * | OHS admin | delete a room allocation for a student | update vacancies when a student applies to leave their room. |
| * * | OHS admin | add a new semester | make sure all new bills and allocations are made in the context of the semester. |
| * * * | OHS admin | view a list of all allocated rooms | check which students stay in which rooms. |
| * * | OHS admin | view a list of rooms filtered by a particular type | group the rooms as per my need. |
| * * * | OHS admin | edit a room allocation for a student | change a student’s room allocation and update the room vacancies. |
| * * * | OHS admin | add a room | perform admin duties related to the new room. |
| * | OHS admin | edit a room’s type | log upgrades like the installation of an aircon. |
| * * * | OHS admin | delete a room | in case I had erroneously added a room to ResiReg. |
| * * | OHS admin | archive the current Semester’s data | keep the data for auditing purposes, but not have it distract me while dealing with a new semester. |
| * * * | OHS admin | view a list of all students | check if students’ particulars need to be modified |
| * * * | OHS admin | add a student to ResiReg | perform admin duties related to the student. |
| * * * | OHS admin | edit the details of an existing student | easily correct any typos and update the student details when needed (e.g. faculty). |
| * * * | OHS admin | delete a student | not have to keep track of students not staying in the College. |
| * | OHS admin | move a deleted student/room to the recycling bin | temporarily store the item in case the deletion is erroneous |
| * | OHS admin | restore a deleted student/room from the recycling bin | reverse an erroneous deletion |
| * * | advanced user | create aliases for commands | perform my common actions while typing less. |
| * * * | first-time user | ask for help | quickly and easily learn how to use the application in one place. |
| * * * | new/confused user | check the syntax for a command | do a task even if I am unsure of the command usage. |
Potential User stories
| Priority | As a… | I can… | So that I can… |
|---|---|---|---|
| * * | OHS admin | export records to csv files | easily create mailing lists or send relevant data to other admin. |
| * * | OHS admin | delete a bill | remove a erroneously added bill. |
| * | OHS admin | edit a room’s semesterly fees | update room charges when costs increase (e.g. from $1000 to $1500) |
| * * | OHS admin | add a bill for a student | keep track of a student’s bills and finances. |
| * * | OHS admin | view all outstanding bills for a student | inform the student of his/her due bills. |
| * * | OHS admin | mark a bill as paid | easily keep track of the remaining amount a student has to pay to OHS. |
| * * | OHS admin | view a list of all students with outstanding bills | remind students of outstanding payments. |
| * * | OHS admin | add a remark to a bill | record any exceptional details about the bill (e.g. cash-only payment). |
Use cases
(For all use cases below, the System is ResiReg and the Actor an OHS admin, unless specified otherwise)
Use case: UC01 - Add a student
MSS
- OHS admin requests to add a student and supplies student details.
- ResiReg adds the student and saves the changes.
Use case ends.
Extensions
- 1a. Student details are missing or invalid, or there is already a student with the same student ID.
- ResiReg shows an error message.
- Use case starts over.
Use case: UC02 - Delete a student
MSS
- OHS admin requests to list students.
- ResiReg shows a list of students.
- OHS admin requests to delete a specified student from the list.
- ResiReg deletes the specified student.
- ResiReg saves the changes in the recycling bin.
Use case ends.
Extensions
-
1a. The list of students is empty.
Use case ends.
-
3a. The specified student does not exist.
-
ResiReg shows an error message.
Use case resumes at step 2.
-
Use case: UC03 - Edit a student
MSS
- OHS admin requests to list students.
- ResiReg shows a list of students.
- OHS admin requests to edit a specific student from the list and supplies details to edit.
- ResiReg edits the student and saves the changes.
Use case ends.
Extensions
-
1a. The list of students is empty.
Use case ends.
-
3a. The specified student does not exist or the supplied details are invalid.
-
ResiReg shows an error message.
Use case resumes at step 2.
-
Use case: UC04 - Allocate a room to a student
MSS
- OHS admin requests to list both students and rooms.
- ResiReg shows a list of students and a list of vacant rooms at the same time.
- OHS admin requests to allocate a particular student to a particular room.
- ResiReg adds the room allocation and saves the changes.
Use case ends.
Extensions
-
2a. ResiReg shows an empty list of students or empty list of rooms.
Use case ends.
-
3a. Student belongs to an existing room allocation, room belongs to an existing room allocation, room does not exist or student does not exist.
-
ResiReg shows an error message.
Use case resumes at step 2.
-
Use case: UC05 - Delete a room allocation for a student
MSS
- OHS admin requests to list room allocations.
- ResiReg shows a list of room allocations.
- OHS admin requests to delete a specific room allocation.
- ResiReg removes the room allocation and saves the changes. The room and student are not modified.
Use case ends.
Extensions
-
1a. The list of room allocations is empty.
Use case ends.
-
3a. Room allocation does not exist.
-
ResiReg shows an error message.
Use case resumes at step 2.
-
Use case: UC06 - Edit an existing room allocation
MSS
- OHS admin requests to list room allocations.
- ResiReg shows a list of room allocations.
- OHS admin requests to edit a specific room allocation from the list and supplies details to update.
- ResiReg updates the room allocation and saves the changes.
Use case ends.
Extensions
-
1a. The list of room allocations is empty.
Use case ends.
-
3a. Room allocation does not exist or details supplied are invalid.
-
ResiReg shows an error message.
Use case resumes at step 2.
-
Use case: UC07 - Undo previous command
MSS
- OHS admin enters a command that changes state.
- ResiReg processes and executes the command.
- OHS admin requests to undo previously entered command.
- This previous command gets undone and the state of
ResiRegis reverted.
Use case ends.
Extensions
-
3a. There are no previously entered commands entered that change state.
-
ResiReg shows an error message.
Use case resumes at Step 1.
-
Use case: UC08 - Redo previous command
MSS
- OHS admin requests to redo previously undone command that changes state.
- ResiReg processes and executes the command.
- This previous command gets undone and the state of
ResiRegis updated.
Use case ends.
Extensions
- 1a. There are no previously undone commands that change state to redo.
- ResiReg shows an error message.
Use case ends.
Use case: UC09 - History command
MSS
- OHS admin requests to list history of previously entered nonempty commands.
- ResiReg shows all the nonempty commands previously entered in chronological order, along with numerical labels in front of commands that indicate position.
Use case ends.
Extensions
- 1a. The history of previously entered nonempty commands is empty.
-
ResiReg shows an error message.
Use case ends.
-
Use case: UC10 - Archive command
MSS
- OHS admin requests to archive the current semester.
- ResiReg resets the allocations of rooms and students, and advances to the next semester in chronological order.
Use case ends.
Use case: UC11 - Find rooms which match a specific criteria
MSS
- OHS admin requests to view a list of rooms which match a certain set of criteria (eg. a list of all vacant rooms of a particular type)
- ResiReg shows a list of rooms which match that criteria
Use case ends.
Extensions
- 1a. There are no rooms matching the given criteria.
-
Resireg shows an empty list
Use case ends.
-
- 2a. The criteria specified are not valid.
-
ResiReg shows an error message.
Use case resumes at step 1.
-
Use case: UC12 - Find students which match a specific criteria
Similar to UC11 - Find rooms which match a specific criteria, just replace rooms with students.
Use case: UC13 - Add a room
MSS
- OHS admin requests to add a room and supplies room details.
- ResiReg adds the room and saves the changes.
Use case ends.
Extensions
- 1a. Room details are missing or invalid, or there is already a room with the same floor and unit number.
- ResiReg shows an error message.
- Use case starts over.
Use case: UC14 - Delete a room
Similar to UC02 - delete a student, just replace student with room.
Use case: UC15 - Edit a room
Similar to UC03 - edit a student, just replace student with room.
Use case: UC16 - Add an alias
MSS
- OHS admin requests to add an alias for a command word.
-
ResiReg adds the alias and saves the changes.
Use case ends.
Extensions
- 1a. Command word or alias is missing.
- 1a1. ResiReg shows an error message.
- Use case starts over.
- 1b. Command word doesn’t exist.
- 1b1. ResiReg shows an error message.
- Use case starts over.
- 1c. Alias already exists.
- 1c1. ResiReg shows an error message.
- Use case starts over.
- 1d. Alias supplied is another command word.
- 1d1. ResiReg shows an error message.
- Use case starts over.
Use case: UC17 - Delete an alias
MSS
- OHS admin requests to delete an alias for a command word.
-
ResiReg deletes the alias and saves the changes.
Use case ends.
Extensions
- 1a. Command word or alias is missing.
- 1a1. ResiReg shows an error message.
- Use case starts over.
- 1b. Command word doesn’t exist.
- 1b1. ResiReg shows an error message.
- Use case starts over.
- 1c. Alias supplied does not exist.
- 1c1. ResiReg shows an error message.
- Use case starts over.
- 1d. Alias supplied is another command word.
- 1d1. ResiReg shows an error message.
- Use case starts over.
Use case: UC18 - Restore deleted items
MSS
- User requests to list recently deleted items from bin.
- ResiReg shows a list of bin items.
- User requests to restore an item in the list.
-
ResiReg restores the item to its original list.
Use case ends.
Extensions
-
2a. The list of bin items is empty.
Use case ends.
-
3a. The supplied index is invalid.
-
3a1. ResiReg shows an error message.
Use case resumes at step 3.
-
Non-Functional Requirements
- Should work on any mainstream OS as long as it has Java
11or above installed. - Should be able to hold up to 1000 records (students and rooms) without a noticeable sluggishness in performance (where a “noticeable sluggishness” is defined as a lag of 1 second) for typical usage.
- Should not require an installer.
- A user with above average typing speed for regular English text (i.e not code, not system admin commands) should be able to accomplish most of the tasks faster using commands than using the mouse.
- The data should not be stored in a Database Management System (DBMS).
- Should not depend on any remote server.
Glossary
- Mainstream OS: Windows, Linux, OS-X
- OHS: Office of Housing Services at the National University of Singapore (NUS)
- OHS Admin: An employee of the OHS who works at a Residential College at NUS
- Residential College: A university residence for students that offers a 2-year program at NUS
- Check-in: Exercise conducted at the beginning of the semester (in Week 0), where a student is informed of his room allocation.
- Outstanding bill: A bill due to be paid by a student.
Appendix: Instructions for manual testing
Given below are instructions to test the app manually.
Launch and shutdown
-
Initial launch
-
Download the jar file and copy into an empty folder.
-
Double-click the jar file. Expected: Shows the GUI with a set of sample studentsn and rooms. The window size may not be optimum.
-
-
Saving window preferences
-
Resize the window to an optimum size. Move the window to a different location. Close the window.
-
Re-launch the app by double-clicking the jar file.
Expected: The most recent window size and location is retained.
-
Getting help for a command
-
Get help for a command using its command word
- Test case:
help students
Expected: A help message describing the purpose of thestudentscommand and the syntax to use it is shown in the results panel.
- Test case:
-
Find out all commands available
- Test case:
help
Expected: A list of all commands available together with a brief description of the purpose of the command is shown in the results panel.
- Test case:
-
Try to get help for a non-existent command
- Test case:
help <word that is not a command or alias>
Expected: An error message stating that the command does not exist is shown.
- Test case:
-
Get help for a command via an alias
-
Prerequisites: At least one alias to a command is defined.
-
Test case:
help <alias>eg. if the aliassis defined,help s.
Expected: The help message for the command the alias points to is shown.
-
Deleting a student
-
Deleting a student while all students are being shown
-
Prerequisites: List all students using the
studentscommand. Multiple students in the list. -
Test case:
delete-student 1
Expected: First student is deleted from the list. Name of the deleted student shown in the status message. The student is added to the bin list. Timestamp in the status bar is updated. -
Test case:
delete-student 0
Expected: No student is deleted. Error details shown in the status message. Status bar remains the same. -
Other incorrect delete commands to try:
delete-student,delete-student x,...(where x is larger than the list size)
Expected: Similar to previous.
-
Adding a room
-
Adding a room to an empty ResiReg
-
Prerequisites: Show all rooms using
rooms. Make sure there are no rooms. -
Test case:
add-room fl/11 n/100 t/NA
Expected: A new room on the 11th floor, room number 100 and of type NA is added. A message describing the room added is shown. -
Test case:
add-room fl/12 n/100
Expected: No room is added. An error message describing the problem is shown. -
Test case:
add-room fl/12 n/100 t/XY
Expected: Similar to previous.
-
-
Adding rooms to a ResiReg with some rooms
-
Prerequisites: ResiReg contains at least one room, and all rooms are shown.
-
Test case: Add a room with the same floor and room number as an existing room.
Expected: No room is added. An error message stating that the room already exists is shown.
-
Editing a room
-
Editing a room while all rooms are shown
-
Prerequisites: Show all rooms using
rooms. Make sure there is at least 1 room. -
Test case:
edit-room 1 t/NN
Expected: The first room in the list has its room type changed to NN. A message describing the edited room is shown in the results panel. -
Test case:
edit-room 1
Expected: No room is edited. An error message describing the problem is shown. -
Other incorrect
edit-roomcommands to try:edit-roomedit-room 0 t/NA,edit-room x t/NA(where x is larger than the list size),edit-room 1 fl/<floor> n/<room_number>(where<floor>and<room_number>match an existing room in ResiReg).
Expected: Similar to previous.
-
Deleting a room
-
Deleting a room while all rooms are shown
-
Prerequisites: Show all rooms using
rooms. Make sure there are multiple rooms. -
Test case:
delete-room 1
Expected: First room is deleted from the list. Message showing details of deleted room is shown. -
Test case:
delete-room 0
Expected: No room is deleted. An error message describing the problem is shown. -
Other incorrect delete commands to try:
delete-room,delete-room x(where x is larger than the list size),delete-room y(where the room at list position y is allocated to a student).
Expected: Similar to previous.
-
Restoring deleted items
-
Restoring a room when list of bin items is being viewed
-
Prerequisites: List all bin items using the
binitem command. A room at index 1 in the list of bin items. -
Test case:
restore 1
Expected: First room is restored from the list. The room is added to the room list (visible ifroomscommand is issued). Timestamp in the status bar is updated. -
Test case:
restore 0
Expected: No item is restored. Error details shown in the status message. Status bar remains the same. -
Other incorrect delete commands to try:
restore,restore x,...(where x is larger than the list size)
Expected: Similar to previous.
-
Permanent deletion of bin items after expiry
-
Verifying permanent deletion of bin items when the list of bin items is viewed. Note: remember to ensure that the pre-requisites are satisfied before either of the test cases is tried.
-
Prerequisites: Set bin expiry time to 20 days via
set-bin-expiry 20. Multiple items in the bin deleted on the current date. -
Test case: Change system time to 21 days in the future (procedure for Mac and Windows 10). Restart ResiReg.
Expected: All bin items should be cleared from the bin item list. -
Test case: Change system time to 15 days in the future (procedure for Mac and Windows 10) Restart ResiReg.
Expected: No bin item is removed.
-
Archiving a semester
-
Archiving the currently displayed semester
- Test case:
archive
Expected: All current allocations are reset, meaning students should no longer be assigned to a room. The GUI should display the succeeding semester.
- Test case:
Allocating a student to a room
-
Allocating a student present in ResiReg, to a Room present in ResiReg
-
Prerequisites: The student should be displayed in the students list, and the room should be displayed in the rooms list. The
toggle-splitcommand may be used for a side-by-side view of the 2 lists. Ensure that Room 1 has been allocated to Student 1. -
Test case:
allocate ri/3 si/3
Expected: The third student in the students list should be allocated to the third room in the rooms list. -
Test case:
allocate ri/1 si/2
Expected: The student is not allocated to the room. An error message describing the problem is shown. -
Test case:
allocate ri/2 si/1
Expected: The student is not allocated to the room. An error message describing the problem is shown. -
Other incorrect delete commands to try:
allocate ri/0 si/3,allocate ri/x si/3,...(where x is larger than the list size)
Expected: An error message describing the problem is shown.
-